Monday, September 26, 2016

Off Camera Flash: Six easy steps for under $250

©John Parmley


It has been quite a while since I have been able post. But we have had a wonderful summer and early fall shooting seniors.  I am also seeing many pictures being posted online showing amateur photos of seniors and kids.  There is one common issue that I am seeing across all of them.

The flash is still on the camera.

If you want to take the look and feel of your images to the next level   GET THE FLASH OFF THE CAMERA!

This can be a scary proposition, but trust me that you won’t regret it.   The costs are coming down that make this a no brainer once you realize the benefits. 

So if you are currently shooting all your portraits with the flash on the camera, take these steps to move your photography forward.  Do it for under $250.
(These steps are for Canon.  The steps are the same for others, the equipment you need is just your camera’s make version).

Step 1. Get a Speedlite (Flash):  You need a Speedlite that can be fired remotely.  And while you can take many of them and connect wireless receivers, Don’t!  Get a Speedlite with the wireless receiver built in.  This gives you two choices.  A) Canon 600 EX RT @ $499 or  B) Yongnuo YN600EX-RT @$114.  Which one do you need?  Depends on what you do.  Are you shooting weddings or doing a lot of work?  If so, get the Canon.  Just shooting Seniors, kids and family and low volumes? Get the Yongnuo.  On a very tight budget?  Get the Yongnuo.

Step 2. Get a wireless transmitter:  Again, you have two choices and it is independent of what you chose in Step 1. A) Canon St-E3-RT @ $299 or B) Yongnuo YN-E3-RT @$79.  Which one do you get?  They both work well.  While I am hardcore staying with Canon on most items, Yongnuo did this one better.  The Canon version does not have the infrared focus assist and the Yongnuo does.  This makes a huge difference in low light situations.  The Yongnuo build is a little less quality, but I have used them in high profile weddings lasting all day with zero problems.  I actually have one of each and only pull the Canon Version out when I have a second shooter. Either will fire both brands of speedlites.

Step 3. Get a light stand:  For amateurs, avoid paying for the expensive stands. You can find 7’ stands for as little as $25 on eBay.

Step 4: Get a flash Hot Shoe Umbrella holder: This sits on top of the light stand and allows you to mount a flash and an umbrella / soft box to it.  These start at $10.


Step 5: Get an umbrella.  These are available starting at $8.  I would spend a little more.  These can be very cheap and break with use and wind.  Get a few.  If you are just starting out with off camera flash, start with the umbrella.  It is forgiving for misplacement.  Migrate to a soft box (starting at $50) after you have learned how to master the umbrella.

Step 6 (Optional): Get a battery pack for your Speedlite. This will improve the flash recycle times if you are shooting shoots quickly.  This is a MUST for weddings.  I have only used the Canon version but others exist. Canon CP-E4n @ $199 or Phottix @ $75.

This will get you started to improving your photography.  Let me know if you have any questions.


Here are some examples with this exact setup……..Enjoy.

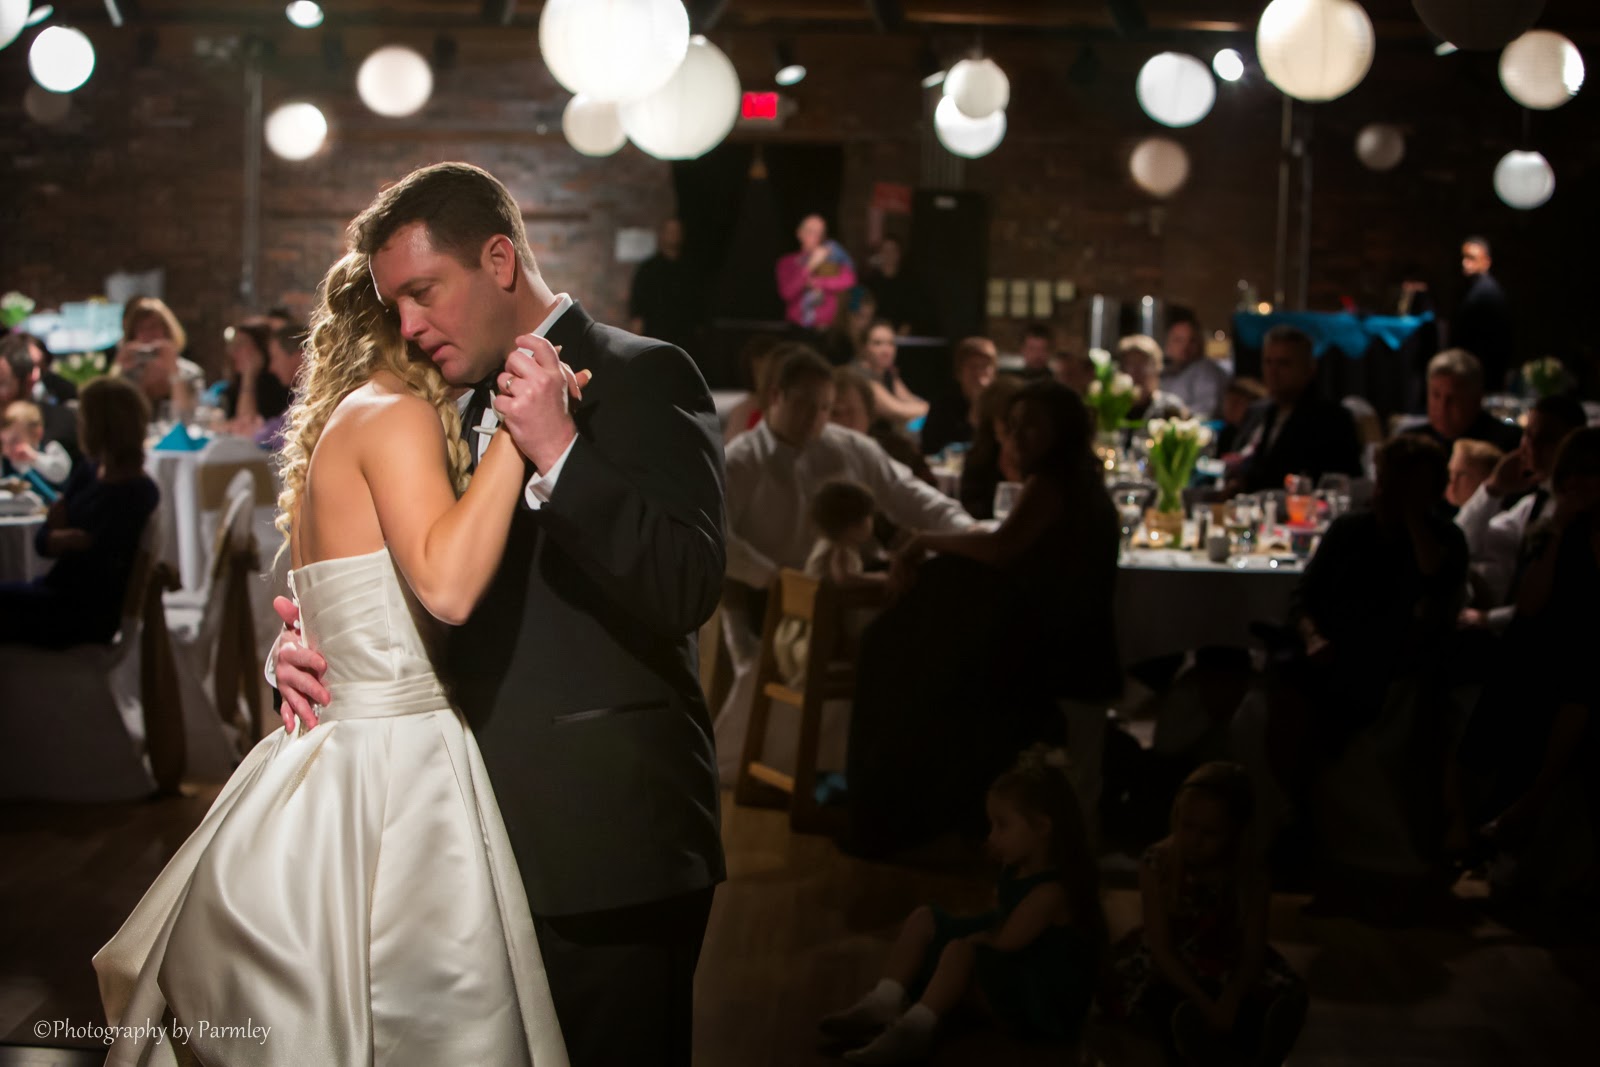
Off Camera Flash (Left)
See Exposing for the ambient in a previous post


Off Camera Flash (right)
Off Camera Flash (left)
2nd Off Camera Flash (right) with Red Gel


Off Camera Flash (right)
2nd Off Camera Flash firing from behind


Off Camera Flash (right) with CTO gel

Sunday, November 1, 2015

Canon ST-E3-Rt vs. Yongnuo YN-E3-RT

©John Parmley

When I first migrated to the Canon 600EX-RT flashes, I purchased 2 ST-E3-RT transmitters. (as a wedding photographer, you need back ups!).

This simple and light weight transmitter gave me everything I needed (so I thought) at a premium cost.  The build quality is as expected with Canon and works flawlessly unless you are standing under or very near a Wi-Fi hot spot.  The bigger problem I had was the lack of the infrared focus assist that you find in your flashes.  In shooting weddings, you often find your self in dark locations.  With out the assist beam, getting focus in these situations was a challenge.

I happened to participate in a seminar put on by Bob Davis, international wedding photographer, and learned about the Yongnuo YN-E3-RT.  It is a knock off of the Canon design, it is less expensive and has built in infrared focus assist. 

But would I trust it in the middle of a wedding?  The bottom line is I do now.  I started off in the studio making sure it worked as the Canon, and it does.  While the build quality is a little less than the Canon, especially in the thumb wheel, it has worked just as I need.  You can see from the picture that I have one of each......just in case a firmware upgrade goes south on one of them.  I can also use a second shooter connected to all the 600EX-RT flashes.


If you are on a budget and not shooting professionally, get the Yongnuo, If you are pro and need multiple transmitters, mix it up.  This way you can save some expense and have one that has the assist beam for those darker locations.  As of 9/26/2015 the Canon version is $263 and the Yongnuo is $84.


Saturday, September 26, 2015

Back Lighting with Flash

©John Parmley

One way I try to create a image that has some depth is to add a back light to rim light my subject.  By doing this, you can create some separation and dynamics to your picture that otherwise is not there.

In this picture, I am shooting with a Canon 5D MIII and a 24-70 2.8L.  There is a light stand directly behind me with 600EX-RT Flash set at 1/4 power with a plastic light diffuser to insure the front of my bride and groom are exposed correctly.  My wife is knelt down behind them with a 600EX-RT at 1/4 power with no modifier.  She is holding it sideways so that the light is sent mostly up and down.  I have that flash manually set to 35mm so that the light spills out onto the dance floor.  I am using the Yongnuo YN-E3-RT transmitter to control the flashes.


While I admit the light coming off the veil is too hot, I think it actually works for the creative look I was looking to achieve.  


The light behind the couple is being held in this orientation, is set at 1/4 power and 35mm


Wednesday, March 11, 2015

Adding Clouds to Pictures

©JP Parmley

Adding clouds to images can add drama and an effect that a clear blue sky lacks.  I have created a short 12 min video tutorial on one way that you can do this.

Here are the before and after image.  Watch the video to see how this was done in Photoshop Elements or CC.   

Enjoy!

Before
After


Saturday, December 6, 2014

ETTL Flash Control and Blinking

©JP Parmley

I have not run into the situation where a subject blinks on EVERY shot.  We all have our techniques to eliminate this for the occasional blinker, but in a recent family shoot one of the kids blinked on EVERY shot.  After running through all the workarounds I remembered an article about this.

I was shooting with three Canon 600EX-RT flashes, two of which were in ETTL mode.  Could the pre-flash of the ETTL be causing him to blink?  Well, after moving them to a manual mode and metering for the right output, the blinking went away.

Sure enough the pre-flash was causing the blink.  Normally I can get around this, but this one had me stumped until I remembered the article I read a few years ago.

Enjoy.


Thursday, June 26, 2014

Exposing for the Ambient Light, Part 2

©JP Parmley

In a previous post, I described exposing for the background.  I wanted to share with you a few pictures from a recent wedding where this was put to use.  In each of these shots, I exposed the shot for the background that included a bright blue sky lit by a bright sun.  I then added two Canon 600EX RT flashes in ETTL each behind 36" softboxes.  Without the flashes, the bride and groom would be underexposed do to the faster shutter speed for the bright sky.  Once the flashes were added, one camera left and one camera right, the colors and depth of the shots exploded.  Take a look at the colors and the even exposure.....no blown out sky, no under exposed subject. 

 
1/200, f9, ISO 200, Canon 5DMIII

1/200, f9, ISO 200, Canon 5DMIII

1/200, f13, ISO 200, Canon 5DMIII


Once you have this method down you can start experimenting with under and over exposing the ambient light.  Take a look at these two pictures....which one was taken first in the day?  The answer might surprise you.  The  first one was taken 15 minutes prior to the second.  So how did we get the "Dusk" look.  I simply underexposed the background by moving the shutter from 1/200 to 1/300.   This small change gave me an appearance that the shot was much later in the day.


1/300, f9, ISO 200, Canon 5DMIII

1/200, f9, ISO 200, Canon 5DMIII

Enjoy

Wednesday, June 25, 2014

Umbrella of Light - The Actual Shot


©JP Parmley

Here are a few pictures of our clients using the Umbrella of Light method described in the previous post. We had a lot of fun pulling these off just before they left.


 Enjoy

Tuesday, May 20, 2014

Umbrella of Light


©JP Parmley


We are headed to a local golf community to shoot a wedding in a few weeks. Our client asked for a special picture that they had seen online of the bride and groom under a translucent umbrella that is flooded with light.  It gives an appearance that the umbrella is shooting the light down on them.  I had also seen similar pictures, but have never replicated it with a client.

This is actually a very easy picture to create using 2 Speedlites and one small softbox.  In the last post, I describe exposing for the ambient light.  In this case I was on my deck, it was about 10 min after sunset and there was still a lot of light compared to what the final image shows. 

Step 1 - Expose the Background the way you want it: So I wanted the background to look completely dark.  I took a test shot with no flashes @ 1/160, f5.6, ISO 640.  It was at least 3 stops underexposed giving me the black background.

Step 2 - Add the back light:  I added the a Speedlite with no modifier behind the model, on the ground, shooting straight up.  This flash was set in manual mode at full power. 
 
Rear light, no main light
Step 3 - Add the main light: Once I had the illumination of the umbrella the way I wanted it, I added the second Speedlite about 36 inches away from the model, camera left.  ETTL was giving way too much light because it was trying to light the entire dark scene.  I moved to a manual mode and ended up at 1/32 power. 

You can play with the power settings on each to provide a slightly different look.

Other than a little noise reduction in the dark areas, there was virtually no post production work on these pictures. 

I will post some pictures of our bride and groom in early June.

Enjoy


Friday, May 2, 2014

Expose for the Ambient Light

©JP Parmley
One of the topics that is initially difficult to understand is "Expose for the Ambient Light" for outdoor portraits.  I have had many questions about why I use off-camera flashes outdoors.  Flashes are for indoor use....correct?  Just the opposite.  I use flashes more outdoors that I do indoors, and here is why.

Expose for the ambient light.  What does this mean?  Simply, set the exposure to capture the ambient light correctly.  This means that your sky or background is properly exposed.  Now, if you insert a person into the frame, they are often a silhouette because the shutter is set very fast to limit the light from the bright background.  The background is correct, but the person is too dark.  This is where the flash fills in the subject so that both the sky and subject are properly exposed. 

So, expose for the ambient light and let the flash(s) expose your subject.  You will end up with the entire picture being properly exposed. Your subjects won't be underexposed and your backgrounds won't be blown out.   Make sure you set your flash to High Speed Sync to keep up with the faster shutter speeds.

In this example, you can see the blurred out grass behind the model.  I set the exposure for the background.  The settings were 1/500th, f7.1, ISO 200.  At these settings the model was well over 2 stops underexposed. If I would have exposed for the model, the grass in the background would have been well over exposed. With a EX600-RT in ETTL mode, shooting through a white umbrella just 18 inches from the model camera left, we bring the exposure back with out the over-flash look.  I added a second flash behind the model camera right at 1/64 power with a 1/4 stop CTO gel attached.  It gave that sunset look, when actually it was taken in mid afternoon.  It was very windy that day and I just needed a quick shot.......the hair was going all over the place!

Enjoy.


Sunday, January 26, 2014

Using High ISO and No Flash to Create "Mood"


©JP Parmley
Wikipeda says that "A mood is an emotional state".

In most situations, I like to keep the ISO as low as possible even with the high performance of the 5DMIII.  Unless I was shooting a quickly moving subject indoors and needed a fast shutter, I usually try to stay below 800.

But I have been experimenting with some situations that for me, create "Mood".  Perhaps the emotional state you will get to from these images will be different than mine, but none the less, it is hard to deny that "Mood" is present.

In these series of images with the bride and groom with their parents, after I had taken several with an on and off-camera flash, I turned the flashes off and cranked up the ISO.  Taken at ISO 3200, f4.5, 1/60th these images create a feeling that the images with the flash just do not portray.  We have received more feedback on these images than any of the others.  Perhaps because the parents of the bridal couple felt the emotion or were reliving the "Mood" of that moment in time.  Whatever it is, shooting higher ISO images to help deliver the "Mood" is now a part of every event I shoot. 


The Power of Off-Camera Flash

©JP Parmley

I took this image on Jan 11, 2014,  our first wedding of the new year.  It shows the power of using off-camera flash.  After posing the bride how I wanted her, an off camera right 580 Speedlight at 1/64th power was shot through a white umbrella.  I had an additional 580 Speedlight on the camera with a white cap diffuser pointing straight up. 

Because the old wooden ceiling was about 20' high, I had it set at 1/2 power.  The diffuser allowed me to throw some light forward, filling the shadow on her face created by the off-camera flash.  If the ceiling had been lower and drywall, I would have probably only need about 1/16 or 1/32 power.  I used a set of Pocket Wizards to remotely fire the off-camera flash.  You can notice the two catch lights in her eyes.  The larger one is from the umbrella and the smaller one is from the front of the on-camera flash diffuser.

The image was shot on a Canon 5D Mark III, ISO 400, f 4.5, 1/80th.

If you have not started using or experimenting with off-camera flash, you should start.  It can add an extra dimension that direct flash just can't provide.


Enjoy!

Saturday, December 28, 2013

Blurred Lines - Moving Bokeh

©JP Parmley
Here is a quick and fun abstract series that can lead to unlimited outcomes.

I started off taking pictures of lights to get some background pictures with colored bokeh to use in some green screen shots.  I added some camera motion and ended up with what I call "Moving Bokeh".

These shots were taken with a Canon 85mm 1.2L lens on a 5D MIII body.  Placing the lens in manual focus, the camera was set at 1/2 sec, f1.2, ISO 50.  I manually forward focused the lens slightly to get the out of focus look.   On the press of the shutter, I moved the camera with a slight wave pattern on some and straight in others.  If you want a bright dot at the end of each blurred line, start with the camera still, press the release, then move the camera.  To eliminate the bright dot, start with the camera in motion then press the release.


You don't need a 1.2 lens to replicate this.  Even with a 3.5-5.6 lens, you can create this effect.  Just zoom out, and in a manual mode, set the aperture to the lowest number (open the widest), set the shutter to about 1/2 sec, then adjust the ISO so your exposure ends up where you want it.  

Enjoy.


Tuesday, November 19, 2013

Melting Snow

©JP Parmley

I took these pictures several years ago exactly one week apart. We had a big snow fall on a Saturday morning and the following week it was nearly 50 degrees.  The quickly melting snow helped provide a foggy morning for the second shot.  They are some of the first HDR images I took and attempts to master PhotoMatrix. 

Each image was comprised of 3 exposures (-1,0,+1) with a fixed aperture.  After Photomatrix created the HDR image, I used Lightroom to boost the saturation and contrast in specific areas.

I have entered the Melting Snow picture into Rangefinder's picture contest.  

Enjoy.


Sunday, September 22, 2013

Cotton Carrier - Camera Carrying System

©JP Parmley

Over the years, I have tried various harnesses and systems to allow me to have two cameras readily available during a wedding or a nature hike.  Up until this year, I have not been happy with anything I have tried.  The Cotton Carrier 2 camera system has changed that.

I typically do not endorse products, only when they clearly stand out for me (i.e. the 5DMIII).  This system is an example where I have been so thoroughly impressed and happy that I thought I would share.

The Cotton Carrier for 2 cameras has enhanced my ability to work quickly, safely and with far less back stress.  The system keeps the cameras close to your body and locked in place until you need them.  This is not like those systems that have the cameras hanging from straps at your sides.  This system allows you to bend down, twist and turn.  Heck, their website even shows a guy on a trampoline!!

The locking mechanism keeps the cameras in place and secure, but gives you an easy method to extract them with natural motions of your hand.  In addition there are tethers that will prevent the cameras from being dropped should you accidentally let go of your gear!  This gives you the extra peace of mind of not dropping $5-$7k worth of equipment.

The harness is comfortable, adjustable and distributes the weight evenly so that you can have your larger lens with you all day.  I have not used it with anything larger than a 70-200 lens, but I imagine it will work well with the 400s as well.

I have used mine at wedding and hikes.  I actually strapped a 70-200 to a 5DMIII and went on a bike ride.  It works perfectly!

For $189 this is a great investment for pros or enthusiasts. 

Check it out HERE.

Here are some pictures from their website.


©JP Parmley


On a casual walk through a Columbus, OH park we ran across a small water hole that was swarming with mosquitoes.  As we were running past to avoid being bit, we noticed a small frog sitting on a branch that had fallen into the water.   It was quite dark and heavily shaded which created a a small challenge.  My first attempt at this picture was at 800ISO, but it required a shutter speed well slower than anything you would want to shoot hand held, even with a 70-200mm 2.8L IS lens.  

A flash would have ruined this picture, so the only solution was to leverage the high ISO range of the 5DMIII.  In a manual mode, I set the aperture to 2.8, the shutter to 1/80th and the ISO to Auto.  With spot metering, to insure the frog was properly exposed, the ISO leveled off at 2500.

Using the rule of thirds, I composed the frog in the lower right intersection and took a shooting angle that would show the branch slightly rising out of the water. Ideally I would have liked to shoot this from a tripod to allow for a slower shutter and lower ISO, but we were just taking a casual walk this outing and did not have it with us.

Notice all those mosquitoes hanging around, I think I got bit 20 times obtaining this picture.  

Enjoy,

JP